Sabado, Marso 21, 2015

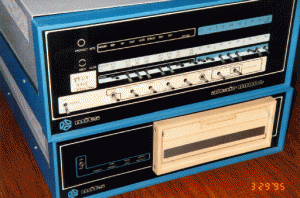
Generation of Computers

  • First Generation (1940-1956) Vacuum Tubes
    The first computers used vacuum tubes for circuitry and magnetic drums for memory, and were often enormous, taking up entire rooms. They were very expensive to operate and in addition to using a great deal of electricity, generated a lot of heat, which was often the cause of malfunctions.
    First generation computers relied on machine language, the lowest-level programming language understood by computers, to perform operations, and they could only solve one problem at a time. Input was based on punched cards and paper tape, and output was displayed on printouts.


  • Second Generation (1956-1963) Transistors
Transistors replaced vacuum tubes and ushered in the second generation of computers. The transistor was invented in 1947 but did not see widespread use in computers until the late 1950s. The transistor was far superior to the vacuum tube, allowing computers to become smaller, faster, cheaper, more energy-efficient and more reliable than their first-generation predecessors. Though the transistor still generated a great deal of heat that subjected the computer to damage, it was a vast improvement over the vacuum tube. Second-generation computers still relied on punched cards for input and printouts for output.
 
  • Third Generation (1964-1971) Integrated Circuits
The development of the integrated circuit was the hallmark of the third generation of computers. Transistors were miniaturized and placed on silicon chips, called semiconductors, which drastically increased the speed and efficiency of computers.
 
  • Fourth Generation (1971-Present) Microprocessors
The microprocessor brought the fourth generation of computers, as thousands of integrated circuits were built onto a single silicon chip. What in the first generation filled an entire room could now fit in the palm of the hand. The Intel 4004 chip, developed in 1971, located all the components of the computer—from the central processing unit and memory to input/output controls—on a single chip.
 
 
  • Fifth Generation (Present and Beyond) Artificial Intelligence
Fifth generation computing devices, based on artificial intelligence, are still in development, though there are some applications, such as voice recognition, that are being used today. The use of parallel processing and superconductors is helping to make artificial intelligence a reality. Quantum computation and molecular and nanotechnology will radically change the face of computers in years to come. The goal of fifth-generation computing is to develop devices that respond to natural language input and are capable of learning and self-organization.
 

Software pa din XD

There are two types of software:
  • Application software, which uses the computer system to perform special functions or provide entertainment functions beyond the basic operation of the computer itself. There are many different types of application software, because the range of tasks that can be performed with a modern computer is so large - see list of software.
  • System software, which is designed to directly operate the computer hardware, to provide basic functionality needed by users and other software, and to provide a platform for running application software. System software includes:
  1. Operating systems, which are essential collections of software that manage resources and provides common services for other software that runs "on top" of them. Supervisory programs, boot loaders, shells and window systems are core parts of operating systems. In practice, an operating system comes bundled with additional software (including application software) so that a user can potentially do some work with a computer that only has an operating system.
  2. Device drivers, which operate or control a particular type of device that is attached to a computer. Each device needs at least one corresponding device driver; because a computer typically has at minimum at least one input device and at least one output device, a computer typically needs more than one device driver.
  3. Utilities, which are computer programs designed to assist users in maintenance and care of their computers.

Software

I learned that computer software or simply software is any set of machine-readable instructions that directs a computer's processor to perform specific operations. Computer software contrasts with computer hardware, which is the physical component of computers. Computer hardware and software require each other and neither can be realistically used without the other. Using a musical analogy, hardware is like a musical instrument and software is like the notes played on that instrument.
Computer software includes computer programs, libraries and their associated documentation. The word software is also sometimes used in a more narrow sense, meaning application software only. Software is stored in computer memory and is intangible, IT CANNOT BE TOUCHED!


Keys

Excel shortcuts

Shortcut keyActionMenu equivalent commentsversion
Ctrl+ASelect AllNoneAll
Ctrl+BBoldFormat, Cells, Font, Font Style, BoldAll
Ctrl+CCopyEdit, CopyAll
Ctrl+DFill DownEdit, Fill, DownAll
Ctrl+FFindEdit, FindAll
Ctrl+GGotoEdit, GotoAll
Ctrl+HReplaceEdit, ReplaceAll
Ctrl+IItalicFormat, Cells, Font, Font Style, ItalicAll
Ctrl+KInsert HyperlinkInsert, HyperlinkExcel 97/2000 +
Ctrl+NNew WorkbookFile, NewAll
Ctrl+OOpenFile, OpenAll
Ctrl+PPrintFile, PrintAll
Ctrl+RFill RightEdit, Fill RightAll
Ctrl+SSaveFile, SaveAll
Ctrl+UUnderlineFormat, Cells, Font, Underline, SingleAll
Ctrl+VPasteEdit, PasteAll
Ctrl WCloseFile, CloseExcel 97/2000 +
Ctrl+XCutEdit, CutAll
Ctrl+YRepeatEdit, RepeatAll
Ctrl+ZUndoEdit, UndoAll
F1HelpHelp, Contents and IndexAll
F2EditNoneAll
F3Paste NameInsert, Name, PasteAll
F4Repeat last actionEdit, Repeat. Works while not in Edit mode.All
F4While typing a formula, switch between absolute/relative refsNoneAll
F5GotoEdit, GotoAll
F6Next PaneNoneAll
F7Spell checkTools, SpellingAll
F8Extend modeNoneAll
F9Recalculate all workbooksTools, Options, Calculation, Calc NowAll
F10Activate MenubarN/AAll
F11New ChartInsert, ChartAll
F12Save AsFile, Save AsAll
Ctrl+:Insert Current TimeNoneAll
Ctrl+;Insert Current DateNoneAll
Ctrl+"Copy Value from Cell AboveEdit, Paste Special, ValueAll
Ctrl+’Copy Formula from Cell AboveEdit, CopyAll
ShiftHold down shift for additional functions in Excel’s menunoneExcel 97/2000 +
Shift+F1What’s This?Help, What’s This?All
Shift+F2Edit cell commentInsert, Edit CommentsAll
Shift+F3Paste function into formulaInsert, FunctionAll
Shift+F4Find NextEdit, Find, Find NextAll
Shift+F5FindEdit, Find, Find NextAll
Shift+F6Previous PaneNoneAll
Shift+F8Add to selectionNoneAll
Shift+F9Calculate active worksheetTools, Options, Calculation, Calc SheetAll
Ctrl+Alt+F9Calculate all worksheets in all open workbooks, regardless of whether they have changed since the last calculation.NoneExcel 97/2000 +
Ctrl+Alt+Shift+F9Rechecks dependent formulas and then calculates all cells in all open workbooks, including cells not marked as needing to be calculated.NoneExcel 97/2000 +
Shift+F10Display shortcut menuNoneAll
Shift+F11New worksheetInsert, WorksheetAll
Shift+F12SaveFile, SaveAll
Ctrl+F3Define nameInsert, Names, DefineAll
Ctrl+F4CloseFile, CloseAll
Ctrl+F5XL, Restore window sizeRestoreAll
Ctrl+F6Next workbook windowWindow, ...All
Shift+Ctrl+F6Previous workbook windowWindow, ...All
Ctrl+F7Move windowXL, MoveAll
Ctrl+F8Resize windowXL, SizeAll
Ctrl+F9Minimize workbookXL, MinimizeAll
Ctrl+F10Maximize or restore windowXL, MaximizeAll
Ctrl+F11Inset 4.0 Macro sheetNone in Excel 97. In versions prior to 97 - Insert, Macro, 4.0 MacroAll
Ctrl+F12File OpenFile, OpenAll
Alt+F1Insert ChartInsert, Chart...All
Alt+F2Save AsFile, Save AsAll
Alt+F4ExitFile, ExitAll
Alt+F8Macro dialog boxTools, Macro, Macros in Excel 97 Tools,Macros - in earlier versionsExcel 97/2000 +
Alt+F11Visual Basic EditorTools, Macro, Visual Basic EditorExcel 97/2000 +
Ctrl+Shift+F3Create name by using names of row and column labelsInsert, Name, CreateAll
Ctrl+Shift+F6Previous WindowWindow, ...All
Ctrl+Shift+F12PrintFile, PrintAll
Alt+Shift+F1New worksheetInsert, WorksheetAll
Alt+Shift+F2SaveFile, SaveAll
Alt+=AutoSumNo direct equivalentAll
Ctrl+`Toggle Value/Formula displayTools, Options, View, FormulasAll
Ctrl+Shift+AInsert argument names into formulaNo direct equivalentAll
Alt+Down arrowDisplay AutoComplete listNoneExcel 95
Alt+’Format Style dialog boxFormat, StyleAll
Ctrl+Shift+~General formatFormat, Cells, Number, Category, GeneralAll
Ctrl+Shift+!Comma formatFormat, Cells, Number, Category, NumberAll
Ctrl+Shift+@Time formatFormat, Cells, Number, Category, TimeAll
Ctrl+Shift+#Date formatFormat, Cells, Number, Category, DateAll
Ctrl+Shift+$Currency formatFormat, Cells, Number, Category, CurrencyAll
Ctrl+Shift+%Percent formatFormat, Cells, Number, Category, PercentageAll
Ctrl+Shift+^Exponential formatFormat, Cells, Number, Category,All
Ctrl+Shift+&Place outline border around selected cellsFormat, Cells, BorderAll
Ctrl+Shift+_Remove outline borderFormat, Cells, BorderAll
Ctrl+Shift+*Select the current region around the active cell. In a PivotTable report, select the entire PivotTable report.Edit, Goto, Special, Current RegionAll
Ctrl++InsertInsert, (Rows, Columns, or Cells) Depends on selectionAll
Ctrl+-DeleteDelete, (Rows, Columns, or Cells) Depends on selectionAll
Ctrl+1Format cells dialog boxFormat, CellsAll
Ctrl+2BoldFormat, Cells, Font, Font Style, BoldAll
Ctrl+3ItalicFormat, Cells, Font, Font Style, ItalicAll
Ctrl+4UnderlineFormat, Cells, Font, Font Style, UnderlineAll
Ctrl+5StrikethroughFormat, Cells, Font, Effects, StrikethroughAll
Ctrl+6Show/Hide objectsTools, Options, View, Objects, Show All/HideAll
Ctrl+7Show/Hide Standard toolbarView, Toolbars, StardardAll
Ctrl+8Toggle Outline symbolsNoneAll
Ctrl+9Hide rowsFormat, Row, HideAll
Ctrl+0Hide columnsFormat, Column, HideAll
Ctrl+Shift+(Unhide rowsFormat, Row, UnhideAll
Ctrl+Shift+)Unhide columnsFormat, Column, UnhideAll
Alt or F10Activate the menuNoneAll
Ctrl+TabIn toolbar: next toolbar
In a workbook: activate next workbook
NoneExcel 97/2000 +
Shift+Ctrl+TabIn toolbar: previous toolbar
In a workbook: activate previous workbook
NoneExcel 97/2000 +
TabNext toolNoneExcel 97/2000 +
Shift+TabPrevious toolNoneExcel 97/2000 +
EnterDo the commandNoneExcel 97/2000 +
Alt+EnterStart a new line in the same cell.NoneExcel 97/2000 +
Ctrl+EnterFill the selected cell range with the current entry.NoneExcel 97/2000 +
Shift+Ctrl+FFont Drop Down ListFormat, Cells, FontAll
Shift+Ctrl+F+FFont tab of Format Cell Dialog boxFormat, Cells, FontBefore 97/2000
Shift+Ctrl+PPoint size Drop Down ListFormat, Cells, FontAll
Ctrl+SpacebarSelect the entire columnNoneExcel 97/2000 +
Shift+SpacebarSelect the entire rowNoneExcel 97/2000 +
CTRL+/Select the array containing the active cell.  
CTRL+SHIFT+OSelect all cells that contain comments.  
CTRL+\In a selected row, select the cells that don’t match the formula or static value in the active cell.  
CTRL+SHIFT+|In a selected column, select the cells that don’t match the formula or static value in the active cell.  
CTRL+[Select all cells directly referenced by formulas in the selection.  
CTRL+SHIFT+{Select all cells directly or indirectly referenced by formulas in the selection.  
CTRL+]Select cells that contain formulas that directly reference the active cell.  
CTRL+SHIFT+}Select cells that contain formulas that directly or indirectly reference the active cell.  
ALT+;Select the visible cells in the current selection.  
SHIFT+BACKSPACEWith multiple cells selected, select only the active cell.  
CTRL+SHIFT+SPACEBARSelects the entire worksheet.
If the worksheet contains data, CTRL+SHIFT+SPACEBAR selects the current region. CTRL+SHIFT+SPACEBAR a second time selects the entire worksheet.
When an object is selected, CTRL+SHIFT+SPACEBAR selects all objects on a worksheet
  
Ctrl+Alt+LReapply the filter and sort on the current range so that changes you've made are includedData, ReapplyExcel 2007+
Ctrl+Alt+VDisplays the Paste Special dialog box. Available only after you have cut or copied an object, text, or cell contents on a worksheet or in another program.Home, Paste, Paste Special...Excel 2007+
Shortcut keyActionMenu equivalent commentsversion
Ctrl+ASelect AllNoneAll
Ctrl+BBoldFormat, Cells, Font, Font Style, BoldAll
Ctrl+CCopyEdit, CopyAll
Ctrl+DFill DownEdit, Fill, DownAll
Ctrl+FFindEdit, FindAll
Ctrl+GGotoEdit, GotoAll
Ctrl+HReplaceEdit, ReplaceAll
Ctrl+IItalicFormat, Cells, Font, Font Style, ItalicAll
Ctrl+KInsert HyperlinkInsert, HyperlinkExcel 97/2000 +
Ctrl+NNew WorkbookFile, NewAll
Ctrl+OOpenFile, OpenAll
Ctrl+PPrintFile, PrintAll
Ctrl+RFill RightEdit, Fill RightAll
Ctrl+SSaveFile, SaveAll
Ctrl+UUnderlineFormat, Cells, Font, Underline, SingleAll
Ctrl+VPasteEdit, PasteAll
Ctrl WCloseFile, CloseExcel 97/2000 +
Ctrl+XCutEdit, CutAll
Ctrl+YRepeatEdit, RepeatAll
Ctrl+ZUndoEdit, UndoAll
F1HelpHelp, Contents and IndexAll
F2EditNoneAll
F3Paste NameInsert, Name, PasteAll
F4Repeat last actionEdit, Repeat. Works while not in Edit mode.All
F4While typing a formula, switch between absolute/relative refsNoneAll
F5GotoEdit, GotoAll
F6Next PaneNoneAll
F7Spell checkTools, SpellingAll
F8Extend modeNoneAll
F9Recalculate all workbooksTools, Options, Calculation, Calc NowAll
F10Activate MenubarN/AAll
F11New ChartInsert, ChartAll
F12Save AsFile, Save AsAll
Ctrl+:Insert Current TimeNoneAll
Ctrl+;Insert Current DateNoneAll
Ctrl+"Copy Value from Cell AboveEdit, Paste Special, ValueAll
Ctrl+'Copy Formula from Cell AboveEdit, CopyAll
ShiftHold down shift for additional functions in Excel's menunoneExcel 97/2000 +
Shift+F1What's This?Help, What's This?All
Shift+F2Edit cell commentInsert, Edit CommentsAll
Shift+F3Paste function into formulaInsert, FunctionAll
Shift+F4Find NextEdit, Find, Find NextAll
Shift+F5FindEdit, Find, Find NextAll
Shift+F6Previous PaneNoneAll
Shift+F8Add to selectionNoneAll
Shift+F9Calculate active worksheetTools, Options, Calculation, Calc SheetAll
Ctrl+Alt+F9Calculate all worksheets in all open workbooks, regardless of whether they have changed since the last calculation.NoneExcel 97/2000 +
Ctrl+Alt+Shift+F9Rechecks dependent formulas and then calculates all cells in all open workbooks, including cells not marked as needing to be calculated.NoneExcel 97/2000 +
Shift+F10Display shortcut menuNoneAll
Shift+F11New worksheetInsert, WorksheetAll
Shift+F12SaveFile, SaveAll
Ctrl+F3Define nameInsert, Names, DefineAll
Ctrl+F4CloseFile, CloseAll
Ctrl+F5XL, Restore window sizeRestoreAll
Ctrl+F6Next workbook windowWindow, ...All
Shift+Ctrl+F6Previous workbook windowWindow, ...All
Ctrl+F7Move windowXL, MoveAll
Ctrl+F8Resize windowXL, SizeAll
Ctrl+F9Minimize workbookXL, MinimizeAll
Ctrl+F10Maximize or restore windowXL, MaximizeAll
Ctrl+F11Inset 4.0 Macro sheetNone in Excel 97. In versions prior to 97 - Insert, Macro, 4.0 MacroAll
Ctrl+F12File OpenFile, OpenAll
Alt+F1Insert ChartInsert, Chart...All
Alt+F2Save AsFile, Save AsAll
Alt+F4ExitFile, ExitAll
Alt+F8Macro dialog boxTools, Macro, Macros in Excel 97 Tools,Macros - in earlier versionsExcel 97/2000 +
Alt+F11Visual Basic EditorTools, Macro, Visual Basic EditorExcel 97/2000 +
Ctrl+Shift+F3Create name by using names of row and column labelsInsert, Name, CreateAll
Ctrl+Shift+F6Previous WindowWindow, ...All
Ctrl+Shift+F12PrintFile, PrintAll
Alt+Shift+F1New worksheetInsert, WorksheetAll
Alt+Shift+F2SaveFile, SaveAll
Alt+=AutoSumNo direct equivalentAll
Ctrl+`Toggle Value/Formula displayTools, Options, View, FormulasAll
Ctrl+Shift+AInsert argument names into formulaNo direct equivalentAll
Alt+Down arrowDisplay AutoComplete listNoneExcel 95
Alt+'Format Style dialog boxFormat, StyleAll
Ctrl+Shift+~General formatFormat, Cells, Number, Category, GeneralAll
Ctrl+Shift+!Comma formatFormat, Cells, Number, Category, NumberAll
Ctrl+Shift+@Time formatFormat, Cells, Number, Category, TimeAll
Ctrl+Shift+#Date formatFormat, Cells, Number, Category, DateAll
Ctrl+Shift+$Currency formatFormat, Cells, Number, Category, CurrencyAll
Ctrl+Shift+%Percent formatFormat, Cells, Number, Category, PercentageAll
Ctrl+Shift+^Exponential formatFormat, Cells, Number, Category,All
Ctrl+Shift+&Place outline border around selected cellsFormat, Cells, BorderAll
Ctrl+Shift+_Remove outline borderFormat, Cells, BorderAll
Ctrl+Shift+*Select current regionEdit, Goto, Special, Current RegionAll
Ctrl++InsertInsert, (Rows, Columns, or Cells) Depends on selectionAll
Ctrl+-DeleteDelete, (Rows, Columns, or Cells) Depends on selectionAll
Ctrl+1Format cells dialog boxFormat, CellsAll
Ctrl+2BoldFormat, Cells, Font, Font Style, BoldAll
Ctrl+3ItalicFormat, Cells, Font, Font Style, ItalicAll
Ctrl+4UnderlineFormat, Cells, Font, Font Style, UnderlineAll
Ctrl+5StrikethroughFormat, Cells, Font, Effects, StrikethroughAll
Ctrl+6Show/Hide objectsTools, Options, View, Objects, Show All/HideAll
Ctrl+7Show/Hide Standard toolbarView, Toolbars, StardardAll
Ctrl+8Toggle Outline symbolsNoneAll
Ctrl+9Hide rowsFormat, Row, HideAll
Ctrl+0Hide columnsFormat, Column, HideAll
Ctrl+Shift+(Unhide rowsFormat, Row, UnhideAll
Ctrl+Shift+)Unhide columnsFormat, Column, UnhideAll
Alt or F10Activate the menuNoneAll
Ctrl+TabIn toolbar: next toolbarNoneExcel 97/2000 +
Shift+Ctrl+TabIn toolbar: previous toolbarNoneExcel 97/2000 +
Ctrl+TabIn a workbook: activate next workbookNoneExcel 97/2000 +
Shift+Ctrl+TabIn a workbook: activate previous workbookNoneExcel 97/2000 +
TabNext toolNoneExcel 97/2000 +
Shift+TabPrevious toolNoneExcel 97/2000 +
EnterDo the commandNoneExcel 97/2000 +
Alt+EnterStart a new line in the same cell.NoneExcel 97/2000 +
Ctrl+EnterFill the selected cell range with the current entry.NoneExcel 97/2000 +
Shift+Ctrl+FFont Drop Down ListFormat, Cells, FontAll
Shift+Ctrl+F+FFont tab of Format Cell Dialog boxFormat, Cells, FontBefore 97/2000
Shift+Ctrl+PPoint size Drop Down ListFormat, Cells, FontAll
A special thanks goes out to Shane Devenshire who provided most of the shortcuts in this list!

References:

Shortcuts for the Visual Basic Editor

Shortcut keyActionMenu equivalent comments
F1HelpHelp
F2View Object BrowserView, Object Browser
F3Find Next 
F4Properies WindowView, Properties Window
F5Run Sub/Form or Run MacroRun, Run Macro
F6Switch Split Windows 
F7View Code WindowView, Code
F8Step IntoDebug, Step Into
F9Toggle BreakpointDebug, Toggle Breakpoint
F10Activate Menu Bar 
Shift+F2View definitionView, Definition
Shift+F3Find Previous 
Shift+F7View ObjectView, Object
Shift+F8Step OverDebug, Step Over
Shift+F9Quick WatchDebug, Quick Watch
Shift+F10Show Right Click Menu 
Ctrl+F2Focus To Object Box 
Ctrl+F4Close Window 
Ctrl+F8Run To CursorDebug, Run To Cursor
Ctrl+F10Activate Menu Bar 
Alt+F4Close VBEFile, Close and Return to Microsoft Excel
Alt+F6Switch Between Last 2 Windows 
Alt+F11Return To Application 
Ctrl+Shift+F2Go to last positionView, Last Position
Ctrl+Shift+F8Step OutDebug, Step Out
Ctrl+Shift+F9Clear All BreakpointsDebug, Clear All Breakpoints
InsertToggle Insert Mode 
DeleteDeleteEdit, Clear
HomeMove to beginning of line 
EndMove to end of line 
Page UpPage Up 
Page DownPage Down 
Left ArrowLeft 
Right ArrowRight 
Up ArrowUp 
Down ArrowDown 
TabIndentEdit, Indent
EnterNew Line 
BackSpaceDelete Prev Char 
Shift+InsertPasteEdit, Paste
Shift+HomeSelect To Start Of Line 
Shift+EndSelect To End Of Line 
Shift+Page UpSelect To Top Of Module 
Shift+Page DownSelect To End Of Module 
Shift+Left ArrowExtend Selection Left 1 Char 
Shift+Right ArrowExtend Selection Right 1 Char 
Shift+Up ArrowExtend Selection Up 
Shift+Down ArrowExtend Selection Down 
Shift+TabOutdentEdit, Outdent
Alt+SpacebarSystem Menu 
Alt+TabCycle Applications 
Alt+BackSpaceUndo 
Ctrl+A Select AllEdit, Select All
Ctrl+C CopyEdit, Copy
Ctrl+E Export ModuleFile, Export File
Ctrl+F FindEdit, Find…
Ctrl+G Immediate WindowView, Immediate Window
Ctrl+H ReplaceEdit, Replace…
Ctrl+I Turn On Quick InfoEdit, Quikc Info
Ctrl+J List Properties/MethodsEdit, List Properties/Methods
Ctrl+L Show Call Stack 
Ctrl+M Import FileFile, Import File
Ctrl+N New Line 
Ctrl+P PrintFile, Print
Ctrl+R Project ExplorerView, Project Explorer
Ctrl+S SaveFile, Save
Ctrl+T Show Available ComponentsInsert, Components...
Ctrl+V PasteEdit, Paste
Ctrl+X CutEdit, Cut
Ctrl+Y Cut Entire Line 
Ctrl+Z UndoEdit, Undo
Ctrl+InsertCopyEdit, Copy
Ctrl+DeleteDelete To End Of Word 
Ctrl+HomeTop Of Module 
Ctrl+EndEnd Of Module 
Ctrl+Page UpTop Of Current Procedure 
Ctrl+Page DownEnd Of Current Procedure 
Ctrl+Left ArrowMove one word to left 
Ctrl+Right ArrowMove one word to right 
Ctrl+Up ArrowPrevious Procedure 
Ctrl+Down ArrowNext Procedure 
Ctrl+SpacebarComplete WordEdit, Complete Word
Ctrl+TabCycle Windows 
Ctrl+BackSpaceDelete To Start Of Word 
Ctrl+Shift+I Parameter InfoEdit, Parameter Info
Ctrl+Shift+J List ConstantsEdit, List Constants

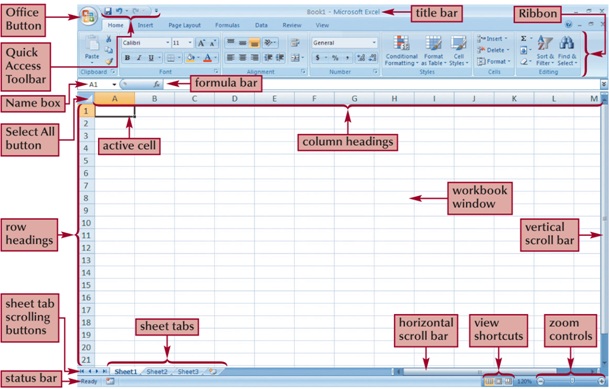
Parts of Microsoft Excel


Microsoft Excel is spreadsheet software. However, it does much more than simple spreadsheets. Excel has components with built-in formulas for statistics, finance and other calculations. These data can be displayed in a chart or graph in Excel. The user can then analyze the data and model scenarios to achieve the desired outcome for a problem or project. Microsoft Excel has various components to make calculating, analyzing and displaying data more efficient.


Logical Operations

Comparison Operators

   <     less than
   >     greater than
   ==    equal to
   !     not
   <=    less than or equal to
   >=    greater than or equal to
   !=    not equal to

> size[,3] > 160
[1] F T F T F                * comparison operators compare data values
                               and return logical values of T (True)
                               when the comparison is true and F (False)
                               when the comparison is false
> size[,1] == 110
[1] T F F F F

Logic Operators

   &     and
   |     or
   xor   exclusive or     (or and only or)
Logic operators are used in conjunction with comparison operators to evaluate more than one logical expression
The following table gives the results for every pair of logical values (TRUE, FALSE, NA), using the &, |, and xor operators. ie.: T & T = T, T & F = F ... Note that the syntax for xor is xor(expression, expression) whereas the syntax for & and | is expression & expression and expression | expression.
         (T T)   (T F)   (F F)   (NA T)   (NA F)   (NA NA)

&          T       F       F       NA        F       NA

|          T       T       F        T       NA       NA

xor        F       T       F       NA       NA       NA

& returns
T when both expressions are T
F when at least one expression is F
NA otherwise
| returns
T when at least one expression is T
F when both expressions are F
NA otherwise
xor returns
T when one expression is T and one is F
F when both expressions are either T or F
NA otherwise
> xor(T & F, T | F)
[1] T

> xor(T & T, T | F)
[1] F
Because of the way numbers are stored in Splus, the results of arithmetic operations are not always what one would expect. This can be a problem when using comparison operators. Try the following expressions.
    x = 0.1 + 0.1 + 0.1 + 0.1 + 0.1 + 0.1 +0.1 + 0.1 + 0.1 + 0.1

> x==1
> print(x,digits = 14)
> x < 1
> x > 1
> trunc(x)
> round(x)
> ceiling(x)
> floor(x)
Logical objects are coerced to numbers when used with functions that require numerical values. When this occurs, TRUE is equivalent to 1 and FALSE is equivalent to 0.
> x_c(1, 2, 3, NA)
> sum(is.na(x)) > 0
[1] T

> x_!is.na(x)
> sum(is.na(x)) > 0
[1] F

> i_!is.na(x)
> i                           * the expression !is.na(x) creates a vector
 [1] T T T T T T T T T F        of logical values: T when x is not a
                                missing value, F when x is missing

Conditional Formatting

Do you ever need to know when you are over or under budget? Want to pick out an important datum from a huge list? Excel's conditional formatting feature can help with all of this and more. While it is a little difficult to use, knowing the basics can help you make sense of whatever project you are working on.

Steps

  1. Apply Conditional Formatting in Excel Step 1 Version 2.jpg
    - Watch a 10 second video
    1
    Input all of your data or download a practice file here. This is useful because conditional formatting is best understood by testing it on data you already have. While you can apply conditional formatting to empty cells, it is easiest to see if the formatting works by using pre-existing data.
  2. Apply Conditional Formatting in Excel Step 2 Version 2.jpg
    - Watch a 10 second video
    2
    Click the cell you want to format. Conditional formatting allows you to change font style, underline, and color. Using conditional formatting, you can also apply strike-through as well as borders and shading to the cells. However, you cannot change the font or the font size of the contents in the cell.
  3. Apply Conditional Formatting in Excel Step 3 Version 2.jpg
    - Watch a 10 second video
     
    Click "Format" > "Conditional Formatting" to begin the conditional formatting process. In Excel 2007 this can be found under "Home" > "Styles" > "Conditional Formatting".
  4. Apply Conditional Formatting in Excel Step 4 Version 2.jpg
    - Watch a 10 second video
    4
    Click "Add >>" to use two conditions. For this example, two conditions are used to see how each one plays off the other. Excel allows up to three conditions per cell. If you need only one condition, skip the next step.
  5. Apply Conditional Formatting in Excel Step 5 Version 2.jpg
    - Watch a 10 second video
    5
    Click “Add >>" one more time to set another condition, or click “Delete..." and choose which condition to remove.
  6. Apply Conditional Formatting in Excel Step 6 Version 2.jpg
    - Watch a 10 second video
    6
    Determine if your first condition is based on the value in the current cell, or if it is based on another cell or group of cells in another part of the worksheet.
  7. Apply Conditional Formatting in Excel Step 7.jpg
    - Watch a 10 second video
    7
    Leave the condition as is (in other words, leave the first drop-down as “Cell Value Is"), if the condition is based on the current cell. If it is based on other cells, change the first drop-down to “Formula Is." For “Formula Is" directions, go to the next step. For “Cell Value Is" directions, do the following:
    • Select what kind of argument works best using the second drop-down box. For conditions between a low setting and a high setting, select “between" or “not between." For conditions using a single value, use the other arguments. This example will use a single value using the “greater than" argument.
    • Determine what value(s) should be applied to the argument. For this example, we are using the “greater than" argument and cell B5 as the value. To select a cell, click the button in the text field. This will minimize the conditional formatting box.
  8. Apply Conditional Formatting in Excel Step 8 Version 2.jpg
    - Watch a 10 second video
    8
    For “Formula Is" you can actually apply conditional formatting based on the value of another cell or cells. After selecting “Formula Is," all the drop-downs disappear and you are left with a text field. This means you can type in any formula you want using Excel’s formulas. For the most part, you want to stick to simple formulas and avoid text or text strings. Keep in mind that the formula is based on the current cell. For an example, think like this: C5 (current cell) = B5>=B6. This means that C5 will change formatting when B5 is greater than or equal to B6. This example can actually be used in “Cell Value Is," but you get the idea. To select a cell in the worksheet, click the button in the text field. This will minimize the conditional formatting box.
    • For example: Imagine you have a spreadsheet with all the days of the current month listed down in Column A; you need to enter data in this worksheet everyday; and you would like the entire row associated with today's date to light up in some way. Try this: (1) Highlight your entire table of data, (2) Select conditional formatting as explained above, (3) Select "Formula Is" and (4) Enter something like =$A3=TODAY() where Column A contains your dates and Row 3 is your first row of data (after your headings). Note that you want the dollar sign in front of the A but not in front of the 3. (5) Select your formats. [1]
  9. Apply Conditional Formatting in Excel Step 9 Version 2.jpg
    - Watch a 10 second video
    9
    Click the cell that contains the value. You will notice that it automatically places dollar signs ($) before the row and column designations. This makes that cell reference non-transferable. This means if you were to apply the same conditional formatting to other cells through copy/paste, they will all reference the original cell. To turn this off, simply click in the text field and delete the dollar signs. If you do not want to set a condition using a cell in your sheet, simply type the value into the text field. You can even enter text, depending on the arguments. For example, don’t use “greater than" as the argument and “John Smith" in the text field. You can’t be greater than John Smith...well, you could, but - oh, never mind. In this example, the whole condition, if you were going to say it out loud, would read something like this: “When this cell’s value is greater than the value in cell B5, then..."
  10. Apply Conditional Formatting in Excel Step 10 Version 2.jpg
    - Watch a 10 second video
    10
    Apply the type of formatting. Keep in mind that you want to offset the cell from the rest of the sheet, especially if you have lots of data. But you also want to make it look professional. For this example, we want the font to become bold and white and the shading to become red. To begin, click “Format..."
  11. Apply Conditional Formatting in Excel Step 11 Version 2.jpg
    - Watch a 10 second video
    11
    Select what type of font changes you would like to make. Then click “Border" and make any changes there. This example does not make border changes. Then click “Patterns" and make changes there. At whatever point you are finished making the formatting changes, click "OK."
  12. Apply Conditional Formatting in Excel Step 12 Version 2.jpg
    - Watch a 10 second video
    12
    A preview of the format will appear under the argument and values. Make changes as needed until the formatting appears the way you would like.
  13. Apply Conditional Formatting in Excel Step 13 Version 2.jpg
    - Watch a 10 second video
    13
    Move on to the second (and third, if you’ve got it) condition and follow the above steps (starting with Step 6) again. You will notice in the example that the second condition also includes a small formula (=B5*.90). This takes the value of B5, multiplies it by 0.9 (aka 90 percent) and applies formatting if the value is less than that.
  14. Apply Conditional Formatting in Excel Step 14 Version 2.jpg
    - Watch a 10 second video
    14
    Click "OK." Now that you have finished all your conditions. One of two things will happen:
    1. No changes will appear. This means that the conditions are not met, so no formatting was applied.
    2. One of the formats you selected appears because one of the conditions has been met.